


1. Intro
Postman으로 외부 API를 테스트 할 때 응답값이 괴랄한 경우가 종종 있습니다. JSON 형태로 돼 있는 데이터지만 URI Encode 처리가 돼 있어서, Postman으로 보기에 난해한 경우가 있습니다. 해당 케이스에 대한 리서치를 포스트해보려 합니다.
Response 데이터 예제
아래의 데이터는 JSON 형태로 돼 있는 데이터입니다.
{
"result":
{
"code": "AB-00000",
"extraMessage": "",
"message": "성공",
"transactionId": "662b5310b14e53836779bde4"
},
"data":
{
"resUserNm": "홍길동",
"commBirthDate": "001231",
"resAuthenticityDesc": "정상적인 데이터입니다.",
"resAuthenticity": "1",
"resLicenseNumber": "0000******12",
"resSearchDateTime": "202404010101"
}
}
JSON
복사
API 응답 값의 정합성 때문에 URI encoding 하여 반환한다고 하면, 다음과 같은 응답값으로 보이게 됩니다. 이런 형태로 나온 데이터를 그때 그때 디코딩과 Jsonify 하기에는 후작업이 불편합니다. 이러한 불편함을 해결하기 위해서는 Postman의 test script를 활용해볼 수 있습니다.
%7B%22result%22%3A%7B%22code%22%3A%22AB-00000%22%2C%22extraMessage%22%3A%22%22%2C%22message%22%3A%22%EC%84%B1%EA%B3%B5%22%2C%22transactionId%22%3A%22662b5310b14e53836779bde4%22%7D%2C%22data%22%3A%7B%22resUserNm%22%3A%22%ED%99%8D%EA%B8%B8%EB%8F%99%22%2C%22commBirthDate%22%3A%22001231%22%2C%22resAuthenticityDesc%22%3A%22%EC%A0%95%EC%83%81%EC%A0%81%EC%9D%B8%EB%8D%B0%EC%9D%B4%ED%84%B0%EC%9E%85%EB%8B%88%EB%8B%A4.%22%2C%22resAuthenticity%22%3A%221%22%2C%22resLicenseNumber%22%3A%220000%2A%2A%2A%2A%2A%2A12%22%2C%22resSearchDateTime%22%3A%22202404010101%22%7D%7D
Plain Text
복사
2. test script
테스트 스크립트는 Request 를 날리고 Response를 받고 난 뒤 어떤 후처리를 할 지 작업 내용을 작성할 수 있습니다. 위의 예제에 대한 스크립트는 아래와 같습니다.
pm.test("Response content type is text/plain", function () {
pm.expect(pm.response.headers.get("Content-Type")).to.include("text/plain");
});
var template = `
<style type="text/css">
.tftable {font-size:14px;color:#333333;width:100%;border-width: 1px;border-color: #87ceeb;border-collapse: collapse;}
.tftable th {font-size:18px;background-color:#87ceeb;border-width: 1px;padding: 8px;border-style: solid;border-color: #87ceeb;text-align:left;}
.tftable tr {background-color:#ffffff;}
.tftable td {font-size:14px;border-width: 1px;padding: 8px;border-style: solid;border-color: #87ceeb;}
.tftable tr:hover {background-color:#e0ffff;}
</style>
<table class="tftable" border="1">
<tr>
<th>Field</th>
<th>Value</th>
</tr>
<tr>
<td>Code</td>
<td>{{result.code}}</td>
</tr>
<tr>
<td>Extra Message</td>
<td>{{result.extraMessage}}</td>
</tr>
<tr>
<td>Message</td>
<td>{{result.message}}</td>
</tr>
<tr>
<td>Transaction ID</td>
<td>{{result.transactionId}}</td>
</tr>
<tr>
<td>Res User Name</td>
<td>{{data.resUserNm}}</td>
</tr>
<tr>
<td>Comm Birth Date</td>
<td>{{data.commBirthDate}}</td>
</tr>
<tr>
<td>Authenticity Description</td>
<td>{{data.resAuthenticityDesc}}</td>
</tr>
<tr>
<td>Authenticity</td>
<td>{{data.resAuthenticity}}</td>
</tr>
<tr>
<td>License Number</td>
<td>{{data.resLicenseNumber}}</td>
</tr>
<tr>
<td>Search Date Time</td>
<td>{{data.resSearchDateTime}}</td>
</tr>
</table>
`;
function constructVisualizerPayload() {
return JSON.parse(decodeURIComponent(pm.response.text()));
}
// 테스트를 위해 console.log를 찍어봅니다. -> Postman 콘솔에서 확인 가능합니다.
console.log(JSON.parse(decodeURIComponent(pm.response.text())));
pm.visualizer.set(template, constructVisualizerPayload());
JavaScript
복사
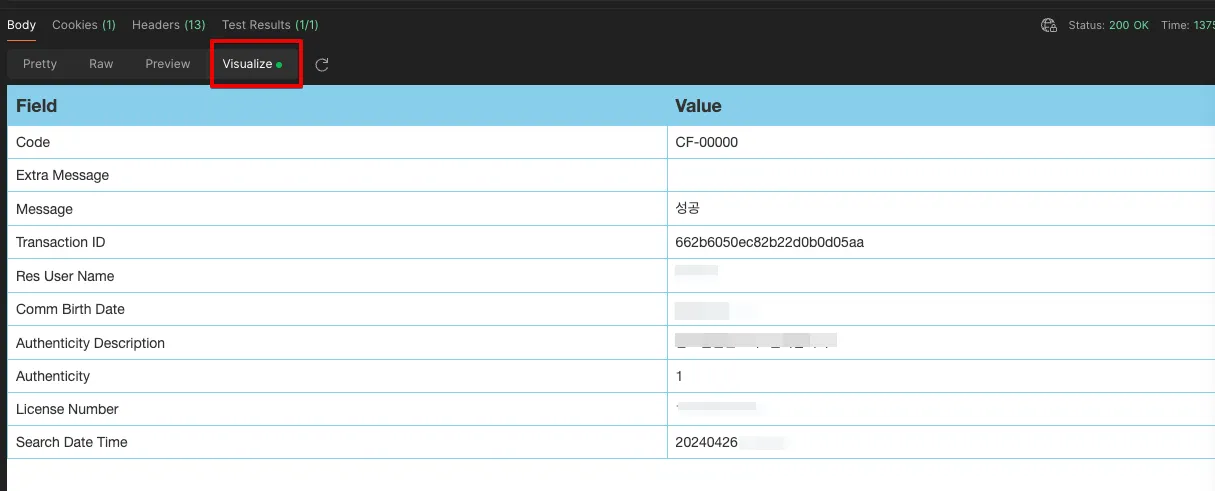
Description
위의 코드에서 짚어볼 부분에 대해 간단한 설명을 작성해보겠습니다.
•
pm.response.text() 형태로 raw 데이터를 가져와야 URI 디코딩이 가능합니다.
•
JSON.parse를 통해 json으로 만든 데이터를 template에 넣어줍니다.
•
pm.visualizer.set() 을 이용하여 visualize 된 화면을 볼 수 있습니다.