


1. init?
새로운 개발 환경을 세팅할 때 저는 주로 ubuntu를 사용합니다. 물론 필요한 세팅은 늘 수동으로 하는 편이어서 귀찮음은 늘 당장의 순간에 맡기곤 합니다. 하지만 늘 고민해왔던 개발 환경 세팅을 정리해보고자 합니다. 이 글은 새로 추가하는 세팅에 따라 업데이트 될 수 있습니다.
2. settings
세팅을 적용하기 앞서, root 계정으로 로그인 하는 것을 추천드립니다. 또한 root 계정의 password를 미리 쉬운 비밀번호로 수정해둡시다.
sudo bash;
sudo passwd;
Bash
복사
apt
기본 우분투 apt 서버를 mirror.kakao.com 서버로 업데이트 해줍니다.
sudo sed -i 's/kr.archive.ubuntu.com/mirror.kakao.com/g' /etc/apt/sources.list;
sudo apt update -y;
Bash
복사
ssh
sudo apt install ssh;
service ssh restart;
Bash
복사
utils
sudo apt install net-tools iputils-ping htop;
Bash
복사
oh-my-bash
기본 터미널에서 oh-my-bash를 이용하여 어여쁜(?) 터미널로 수정해줍니다.
curl
sudo bash -c "$(curl -fsSL https://raw.githubusercontent.com/ohmybash/oh-my-bash/master/tools/install.sh)";
sudo sed -i 's/OSH_THEME="font"/OSH_THEME="agnoster"/g' ~/.bashrc;
Bash
복사
wget
sudo bash -c "$(wget https://raw.githubusercontent.com/ohmybash/oh-my-bash/master/tools/install.sh -O -)";
sudo sed -i 's/OSH_THEME="font"/OSH_THEME="agnoster"/g' ~/.bashrc;
Bash
복사
D2Coding
Naver에서 제공해주는 멋진 폰트가 있습니다. 저는 주로 이 폰트를 사용하여 개발 환경을 세팅합니다. 최신 폰트는 해당 페이지에서 확인 가능합니다.
Linux Terminal
sudo apt install unzip fontconfig;
sudo wget https://github.com/naver/d2codingfont/releases/download/VER1.3.2/D2Coding-Ver1.3.2-20180524.zip;
sudo unzip -d /usr/share/fonts/d2coding D2Coding-Ver1.3.2-20180524.zip;
sudo rm D2Coding-Ver1.3.2-20180524.zip
sudo fc-cache -f
sudo fc-list | grep -i d2c
Bash
복사
VS-Code(Windows)
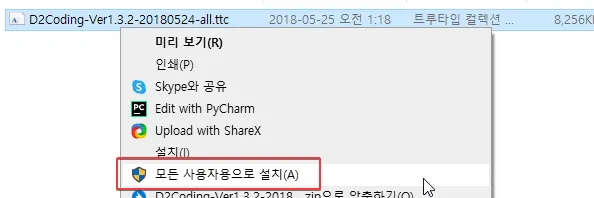
D2Coding Zip 파일을 다운로드 후 Windows에 설치합니다.
VSCode에 들어가 아래와 같이 세팅합니다. Ctrl + , or terminal.integrated.fontFamily
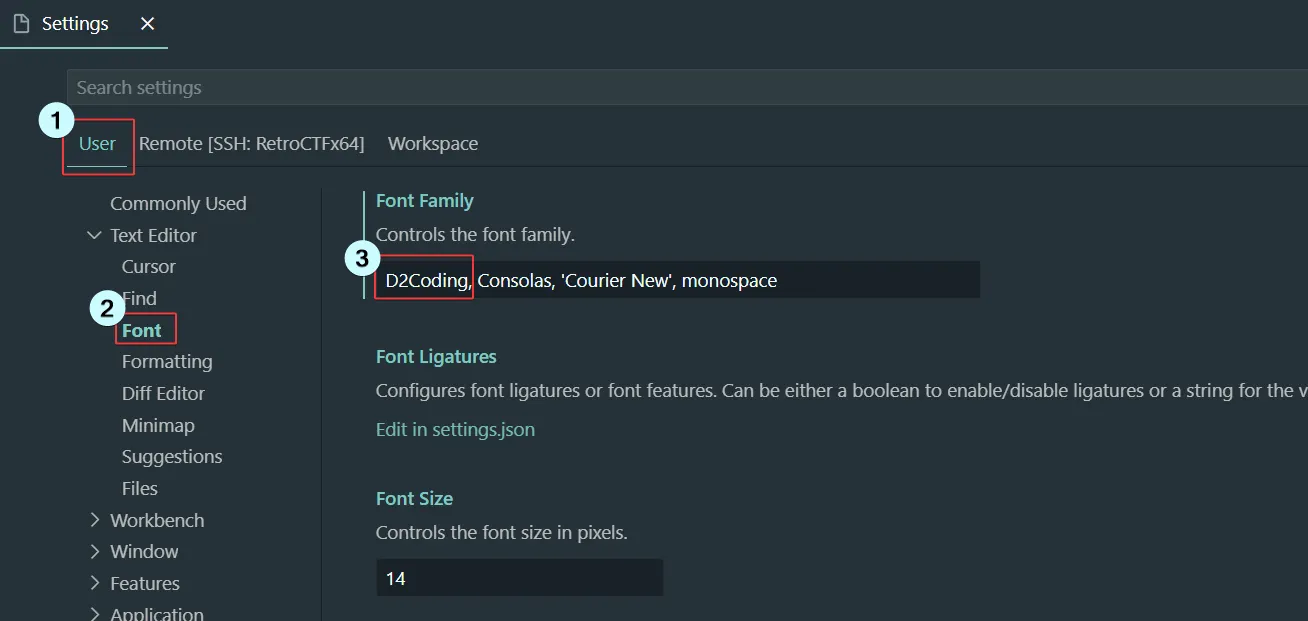

VSCode에 적용되는 코드를 확인하기 위해서는 VSCode를 재시작해야 합니다.
3. Python environments
python libraries
sudo apt install -y python3-dev python3-setuptools python3-pip python3-smbus libsqlite3-dev pkg-config
Bash
복사
anaconda
intel x86
AWS EC2 instance 설치 시 Intel x86 선택할 경우도 포함됩니다.
sudo curl https://repo.anaconda.com/archive/Anaconda3-2023.09-0-Linux-x86_64.sh > anaconda3.sh;
bash anaconda3.sh;
bash;
Bash
복사
arm, aarch64
AWS EC2 instance 설치 시 ARM 선택할 경우도 포함됩니다.
sudo curl https://repo.anaconda.com/archive/Anaconda3-2023.09-0-Linux-aarch64.sh > anaconda3.sh;
bash anaconda3.sh;
bash;
Bash
복사
conda create -n RETRO python=3.11;
conda activate RETRO;
Bash
복사
4. Summary
init script(without python)
# su root.
sudo bash;
sudo passwd;
# apt update & install libraries.
sudo sed -i 's/kr.archive.ubuntu.com/mirror.kakao.com/g' /etc/apt/sources.list;
sudo apt update -y;
sudo apt -y install ssh unzip fontconfig net-tools iputils-ping htop build-essential pkg-config;
# MySQL (ex> it needs for python3 mysqlclient)
sudo apt-get install mysql-client mysql-server libmysqlclient-dev
# install oh-my-bash and change font.
sudo bash -c "$(curl -fsSL https://raw.githubusercontent.com/ohmybash/oh-my-bash/master/tools/install.sh)";
sudo sed -i 's/OSH_THEME="font"/OSH_THEME="agnoster"/g' ~/.bashrc;
# add d2coding fonts.
sudo wget https://github.com/naver/d2codingfont/releases/download/VER1.3.2/D2Coding-Ver1.3.2-20180524.zip;
sudo unzip -d /usr/share/fonts/d2coding D2Coding-Ver1.3.2-20180524.zip;
sudo rm D2Coding-Ver1.3.2-20180524.zip
sudo fc-cache -f
sudo fc-list | grep -i d2c
# Service reset.
service ssh restart;
Bash
복사